How We Turned Our Garage into a Living and Dining Room
Converting our garage into a living and dining room was a major project. We were also quite meticulous, which helped in the long run. Especially because we worked with professionals on the electrical wiring and plumbing. The entire process took nine months from start to finish.
Do You Need Permission to Convert Your Garage into a Living and Dining Room?
The short answer to this question is: It depends. The permitting process for converting a garage into a bedroom, bathroom, or other living space will vary greatly depending on where you live. You may be asking if you need a general contractor to obtain a permit; in our experience, this is not necessary. Typically, you’ll require a floor plan. Depending on your town or state’s permitting laws, you may be required to pay a charge and undergo inspections throughout the process.
Your town/state may require that the work be performed by a licensed contractor, plumber, or electrician, however this varies. In our situation, we submitted our design to the municipality ahead of time, obtained a permit to conduct the work, and then had town inspectors inspect the plumbing and electrical work. This was a really smooth and straightforward process, so when we chose to sell the house, there were no complications.
It is critical to do any garage conversions correctly and lawfully in accordance with your local legislation and laws. Moving on with a project without completing this may result in fines and a significant hassle if you decide to sell your house later.
Preparing the Garage
The first step was to prepare the garage to become an indoor living space. We bought a shed to keep in our backyard for storage. Many folks wondered how we got rid of our garage. But the truth is that we don’t have much things. Whatever was in the garage, we could store in the shed or basement.
Here is the procedure for preparing the garage:
Empty the garage (now is definitely a good time to get a dumpster if you’ll be throwing away a lot of additional materials).
Seal all cracks and insulate your foundation using spray and stiff foam.
Remove the garage door and construct a wall to enclose the space (the wall to the left of the garage door has no windows).
Remove the wall between the garage and the house itself
Replace shingles on the outside, and shingle the front outside.
Build the subfloor
The next phase in garage conversion was to construct the subfloor, which is critical because it serves as the basis for everything else. We confirmed that the floor was structurally sound before building the subfloor on top of it. We constructed a subfloor from 2x10s and a main beam along the center, with anchor bolts fastened to the ground on the knee wall (per local building code). The goal was to match the new floor height to the current floor in the house.
A laser level was used to draw a line, and exact measurements were recorded while accounting for the thickness of the plywood and the intended flooring. This resulted in a seamless transition between the new and existing flooring, as shown in the photographs below. The subfloor was insulated with fiberglass before the 3/4-inch tongue-and-groove plywood was installed. The plywood was then firmly bonded to the subfloor structure to provide stability.*
Because the garage ceiling lacked drywall and a lofted design was preferred, the existing ceiling joists and collar ties were removed. Three support beams were built instead, using 2×10 lumber. These beams were eventually polished to give the appearance of a single, solid beam, resulting in a clean and coherent effect.
Framing Interior Walls, Doors, and Pocket Door
When converting a garage into a living and dining room, you will most likely need to create multiple inside walls and doors to separate the bathrooms and rooms. In this case, we used this to separate the new living and dining room, from the rest of the house (where the former living and dining room were), hallway, and enclosed the separate stairs to the basement.
How to Convert a Garage into a Living and Dining room (Framing Walls)
Framed bathroom wall and doorway, including pocket door.
Framed wall between the stairs to the basement and the rest of the property (bedrooms, kitchen).
Framed a door and wall to make an entrance and hallway to the property in the current dwelling.
Install Electrical Wiring and Rough Plumbing
After the framing and subfloor were finished, the electrician and plumber were scheduled. Early in the project, coordination with both trades was done to determine the best time to start rough-in work. The electricians ran wiring for ceiling lights and erected outlet and switch boxes to ensure optimum placement for future drywall installation. Meanwhile, the plumbers installed the rough plumbing for the shower drain, vanity sinks, and toilet, routing the lines through a wall cavity linking the garage to the basement. Inspections of the electrical and plumbing rough-ins were arranged and completed.
Install sheetrock and insulate the walls and ceiling.
To improve efficiency, a professional crew added spray foam insulation to the bedroom ceiling. This strategy not only saved significant time and labor, but it also improved energy efficiency, making it eligible for prospective tax breaks. Prior to installing the drywall, the interior walls were insulated with fiberglass batts. All drywall seams were taped, and a long-lasting Venetian plaster veneer layer was used to help reduce odors. Finally, the walls were sanded for a flawless finish.
Install Ceiling
Garage conversions provide various ceiling options, including low-cost drywall that requires mudding and painting. A vaulted ceiling was chosen for this project to make the area more appealing. The original plan called for 1×10 pine planks, however due to material limitations, 1×8 and 1×10 primed pine were utilized instead. The boards were painted with ceiling paint to achieve a consistent look. To maximize natural light, a skylight was installed in the bathroom before ceiling construction began.
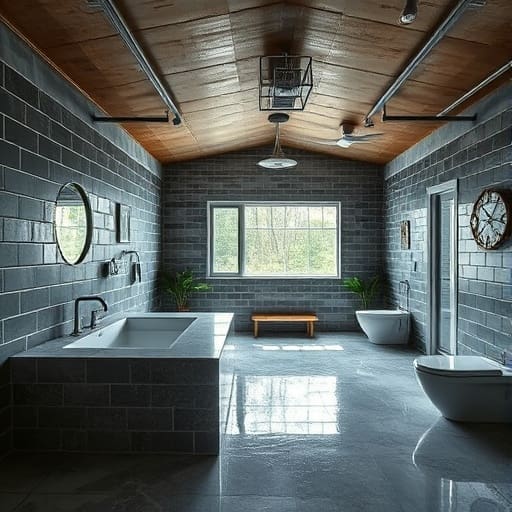
Bathroom Installation
The shower installation proved to be one of the most difficult tasks in the bathroom. To fit the acquired shower pan, the walls were framed slightly broader, resulting in a minor bump out. Cement board was used as a substrate, followed by a stucco foundation layer and waterproof paint. Multiple coatings of Venetian plaster were used for durability and aesthetics, followed by a protective sealer.
Priming and Painting
The ceiling was prepped and painted before the wood floor was installed. All walls, trim, and doors were then primed and painted in preparation for the final finishes.
Install Wood Flooring and Trim.
Following the painting, pre-finished Sawyer Mason flooring in Oak Bluffs was installed – a premium product chosen for its quality and durability, which has previously proven successful in other projects. The flooring’s varied installation choices meet a variety of design requirements. After completion, 1×6 baseboards and 1×4 primed pine window trim were put to finish the sace.
Project Summary: Garage Conversion to Living and Dining Room
This garage conversion represented the most ambitious renovation undertaken to date – a complete transformation of raw space into functional living quarters. As a first-time ground-up project, it demanded meticulous planning, skilled coordination, and mastery of entirely new construction techniques.
The effort yielded exceptional returns:
• Space Optimization: Added valuable living area without expanding the home’s footprint
• Property Value: Significantly enhanced marketability and appraisal value
• Cost Efficiency: Achieved through careful material selection and hands-on execution
The finished space exceeded expectations, proving that strategic ADU construction companies such as L Square Construction can deliver premium results while maintaining budget control. This project stands as a testament to how innovative conversions can maximize a property’s potential.
Creative methods to upcycle your garage
If you are considering turning your garage into a living area, the most challenging part of the process may be determining how you want to utilize it. A garage is a mostly blank canvas for customizing. There are numerous remodeling options available, whether you want to add a personal touch like a game room or yoga studio, or an extra bathroom or bedroom.
After you’ve decided what you want out of your new living space and ensured that it’s covered by your home insurance policy, you’ll need to be aware of any local restrictions that need you to seek a permit for conversion. Many garages lack adequate ventilation and insulation to function as suitable living spaces, and the majority are not wired for plumbing, gas, or electricity, all of which require separate permits.
To help you make the best decision for your remodel, we’ve created a comprehensive list of 51 garage conversion ideas that will inspire you. You can also skip to the images at the bottom of this section, which investigate various conversion options. In any case, by converting a garage into more useful living space, you’ll be able to comfortably expand beyond your present area while also increasing the value of your property and having fun.
A spare bedroom or a second principal bedroom suite can enhance the functioning of your house and result in happier guests who are tired of sleeping on the couch. Use these ideas as inspiration for your garage conversion project.
1. Soundproof your walls and doors.
Soundproofing is essential, especially if your refurbished garage bedroom overlooks a nearby street or alley. Nobody wants to be awakened by road noise.
2. Create a layered tray ceiling.
Tray ceilings include an elevated center panel that creates a dramatic silhouette in your refurbished bedroom. Integrated recessed lighting with a dimmer control might help to soften the ambiance.
3. Wire your ceiling for fiber optic lighting.
Fiber optic lighting is a distinctive feature that will make you forget you ever had a garage. This luxurious addition creates the illusion of a starry night sky, adding a sense of escapism.
4. Create distinct areas for leisure.
Your new garage bedroom is certainly large enough to accommodate more than simply a bed. Divide the room into distinct sections, such as a sleeping area, a reading or sitting nook, and a meditation corner.
5. Build your dream garage kitchen.
While a small kitchen remodel may increase the value of your house, a converted kitchen can be custom-designed to meet your family’s needs. Even better, if your existing kitchen has an inner wall that borders the garage, you can remove it and expand the kitchen. If you want to transform this room into your fantasy chef’s kitchen, keep these ideas in mind.
6. Create a layout that works for you.
The triangle formed by the sink, stove, and refrigerator is where the majority of kitchen activity occurs. Before you start renovating, you can develop a layout that works for your flow.
7. Use skylights to provide enough of natural light.
If your current kitchen is small or dark, a new garage kitchen gives you the opportunity to start from scratch. Open up the ceiling with many skylights to let enough of natural light into your room.
8. Dream big and include the things you want.
If your current garage is spacious enough, now is the time to upgrade to the appliances and amenities you’ve always wanted but couldn’t fit in your kitchen. Just make sure you always have a fire extinguisher nearby.
If your current home office setup makes you feel tight and claustrophobic, consider converting your garage into an office. A makeover project like this allows you to organize your home office anyway you like, creating workstations for different family members or types of projects.
9. Control electronics with smart home technologies.
Creating a smart home office allows you to prepare for the future of working from home. 10. Set up distinct work places for various projects.
Just as rotating between sitting and standing can boost your job productivity, so can shifting to a different place to complete a new task, even if it’s just across the room.
10. Build Different Work Zones for Varying Projects
Just as alternating between sitting and standing can improve your work productivity, changing locations for different tasks can also have a positive impact – even if it’s just moving to a different spot in the same room. Transforming your garage into a home office allows for a clear separation between your work life and home life, even while being on the same premises.
11. Improve Your Wi-Fi Coverage
If your garage is far from your home’s Internet modem, consider installing devices to boost your Wi-Fi signal and ensure a strong connection during video calls. Additionally, using a VPN can help protect against cybersecurity threats.
12. Incorporate Functional Built-In Storage

Utilize the wall space in your revamped garage by installing custom-built storage units. These can be purchased or specifically designed to fit your unique needs and style.
13. Consider Adding a Bathroom
A garage conversion is the perfect opportunity to add an additional bathroom to your home, whether it’s a small half bath or a luxurious spa-like retreat. Make sure to properly waterproof the area and have open peril homeowners insurance in case of any water damage.
14. Install Radiant Floor Heating
Garage floors are typically made of concrete, making it easier to install flooring of your choice. Consider adding a floor heater to keep your feet warm during the colder months, especially if this room tends to be cooler than the rest of your home.
15. Create an Expansive Wet Room
Open shower designs with floor drains can create the illusion of a bigger bathroom. These adaptable spaces can fit into various sizes and shapes, making them a perfect addition to your garage renovation.
16. Include a Luxurious Soaking Tub
For those who enjoy a relaxing soak, make sure to leave space for a garden tub in your remodeling project. Consider installing a corner tub to save space for other bathroom features.
17. Revamp with a Leisurely Half Bath
Incorporating a half bath is a thrifty alternative to building a full bathroom. Additionally, a half bath can easily accompany any conversion plans (excluding those that involve a full bathroom) you may have in mind.
18. Cultivate a Cozy Garage Living Room
Reimagine your garage as an additional living room or family room. A remodeled garage offers endless possibilities for creating your ultimate relaxation hub. Draw inspiration from the following ideas for your new living room.
19. Sink into a Conversation Pit
Once relegated to the ’60s and ’70s, conversation pits have made a comeback in modern home design. Construct a subfloor around the perimeter of your garage to create a sunken pit in the center. Furnish it with bean bags or a comfortable sectional couch.
20. Enhance the Ambiance with Faux Beams
Beams and trusses add a rustic and cozy feel to a room. Install faux beams on the ceiling of your new living room to give it an architectural charm.
Welcome in Natural Light with Belgian-Style Steel and Glass Doors
Why settle for traditional overhead garage doors when you can have stylish glass and steel French doors that flood the room with natural light? Perfect for spaces not used as car storage.
Create a Cozy Atmosphere with an Electric Fireplace and Mantel
If you prefer a home with a fireplace, consider installing an electric fireplace with a faux mantel. This will give the illusion of a roaring fire without the dangers associated with traditional fireplaces (plus, most homeowners insurance policies cover fire damage).
Gym & Fitness Conversions
21. Install a Mirrored Wall
Mirrors help maintain proper form during workouts, reducing injury risk. A mirrored wall could prevent you from joining the 450,000 annual exercise-related injuries.
22. Add Rubber Tile Flooring
Shock-absorbent rubber protects knees during high-impact workouts and prevents concrete damage from dropped weights.
23. Build a Home Boxing Ring
A regulation 16’x16’ ring fits easily in a two-car garage—perfect for sparring sessions that’ll impress gym regulars.
24. Design a Yoga Studio
With rubber flooring and mirrors, you can perfect poses like downward dog in a serene, dedicated space.
Game Room Ideas
Transform underused garage space into an entertainment hub:
25. Wet Bar Installation

Elevate game nights with a draft system—just remember no drinking and driving (even in the garage).
26. Arcade Setup
Add a pool table, pinball machines, or darts for instant fun. Insulation upgrades ensure year-round comfort.
27. Indoor Golf Green
Skip the course with a putting green or virtual tee box (budget carefully—these can be pricey).
28. Display for Collectibles
Glass-walled showcases highlight prized possessions—just insure them properly.
Home Theater Conversion
29. Projector + Blank Wall
No screen? A flat white wall works perfectly for cinematic visuals.
30. Tiered Seating
Use garage floor elevation to create stadium-style seating.
31. Wireless Surround Sound
Bluetooth speakers eliminate messy wires. Soundproofing keeps peace with neighbors.
32. Blackout Solutions
Cover windows with light-blocking curtains or remove them entirely.
Laundry Room Upgrades
33. Dual Washer/Dryer
Ideal for large families—cuts laundry time in half.
34. Folding Station Island
Custom-height counters prevent back strain.
35. Retractable Clothesline
Air-dry clothes to save energy; use a dehumidifier in damp climates.
Art Studio & Guest House
36. Glass-Panel Garage Door
Flood the space with natural light and inspiration.
37. Adjustable Track Lighting
Spotlight artwork without permanent fixtures.
38. Family Mural Wall
Reserve one wall for collaborative creativity.
39. Photography Darkroom
Block all windows for developing prints professionally.
40-43. Detached Guest Suite
Smart doorbell for privacy
Compact kitchenette
Space-saving Murphy or loft bed
Room dividers for privacy
Bonus Conversions
Kids’ playroom with climbing wall
Teen hangout (TV, mini-fridge, gaming)
Craft room + storage island
Split-level multi-use space
Greenhouse (check zoning laws)
Soundproof music studio
Cat paradise with climbing structures
Climate-controlled dog run